Showing posts with label plans. Show all posts

Sunday, June 2, 2013

Thoughts on the Next Big Project!

After successfully completing a new ensemble, I find myself inspired to do more.  For my next big project, I'm contemplating making a French-style round (untrained) gown circa 1530.  I'd like to pair it with a gable hood.  More accurately, a well-constructed gable hood, with all the pertinent layers, not just an ill-fitting one-piece affair.

File:Hans Holbein d. J. 035.jpg
Portrait of Lady Guildford
by Holbein (c1527)
While such a gown has certain telltale features such as turned back sleeves, and a deep square neckline, I do have a few options to figure out.  Foresleeves, for example.  Do I opt for a simple pleated foresleeve a la Lady Guildford?  Or do I chose a brocade like in the famous portrait of Queen Jane Seymore?  (In other versions of Queen Jane's portrait, she, too, wears the pleated sleeve.)

File:Hans Holbein d. J. 032b.jpg
Jane Seymore,
Queen of England (c1536)
Regarding fabrics, I am leaning heavily towards using a damask to decorate the kirtle and a wool (instead of velvet) for the gown.  I could line the turn-back sleeves in velvet then.  (There is no way I'd want to line the sleeves in fur; too heavy, too hot for my climate.)

Perhaps the biggest potential problem with this gown, though, will be fit.  I have seen many such gowns that are not properly fitted through the back and shoulders resulting in the sleeve cap falling off towards the arm.  My knowledge of general garment sewing should help me here.  Thus far, I've been able to sew similar dresses with no major fitting issues.


Test-garment bodice,
note the shoulders
For the hood, it is pretty straight forward.  The most obvious differences seem to be the length of the linen front piece near the jawline.  In earlier portraits, the linen is longer.  The lappets, the fabric usually golden in color that is outer most on the sides also varies in length, but as it is usually pinned up, it does not change the overall look too much.

Most period images featuring a gable hood show the front only, but thankfully Holbein did a sketch that shows the back.
File:Gablehood front-back c1535 detail.jpg
Holbein sketch with back of gable hood


I have about six months before our kingdom's next big court event, so I have some time to fret about the details.  In the meantime, I'm also considering a much smaller project for the next SCA event that I'll be attending.

My local barony's anniversary is this month and the theme is Italian.  I am trying to figure out if I could use one of my existing kirtles, but add some Italian-style sleeves.  I think that would add an appropriately Italian-looking silhouette to something I already own.  Thankfully, I have some very knowledgable friends who specialize in Italian Renaissance clothing.  I'll be asking them for advice!

Saturday, June 1, 2013

Project Post-Mortem: Coronation Gown inspired by Early Tudor Clothing

Today was the 35th anniversary for the SCA Kingdom of Caid and the coronation of our newest King and Queen.  As such, I decided to mark the occasion by wearing a new gown.

Readers may recall that I started a new project back in December.  That project was in anticipation of this coronation.  But as the date drew nearer, I grew quite sick of hand-sewing eyelets on the kirtle.  So, the Thursday before last, I decided to chuck the whole project (for now), and I started over (mostly).

The chemise was already completed, so I just needed to make a new kirtle, a new over-gown, and a new bonnet.  I still wanted to base the new clothing on a couple of images I found in The Queen's Servants by Caroline Johnson.  (Johnson's book focuses on women's clothing from around 1500 to 1520, which is definitely not a "popular" period for costuming in Caid.  At least, not at the time of publication.)  Since I wanted to try something new and different, I sought out inspiration that was also different from I see frequently in Caid.  The image on page 15 of Jone Wyddowsoun from 1513 featured both the pointed bonnet style and peaked gown neckline that I would ultimate emulate.  The image from page 17 of Emme Pownder also showed the same bonnet style, but I used it to inspire my not-quite-so-enormous sleeves.

Kirtle complete!
For the kirtle, I used a beautiful russet wool that was gifted to me.  I opted for the "V" neckline to emulate the kirtle in the images listed above.  Plus, it seemed distinctly (early) English-Tudor as opposed to the very popular French-style gowns of the 1520s and onward.

As I am actively working towards a smaller figure, I chose to make the kirtle a bit too small.  Being side-laced, this only meant that for now it had a gap between the lacing edges that would be unseen under the gown.  This was a very quick part of the project in that I was able to draft, cut, and assemble the entire piece in one day.

Checking the combination
While I do have a gorgeous golden silk for an over-gown, I opted to make a quick trip to our local fabric district to see if I could find an inexpensive fabric from which to make the over-gown.  (When I make a new style of garment for the first time, I like to do so in a fabric that did not cost a fortune.  There is nothing more depressing than "ruining" beloved fabric for a gown that just did not quite work out.)

Bodice completed
My trip was a terrific success in that I found SEVERAL fabrics, all for less than $4.00/yard!  To best coordinate with the russet, I chose to use a damask in dark brown/black with a brass/golden pattern.  Had I been smart, I would've picked up a dark linen to use as lining.  I did not, so I had to use linen from my stash, which was white.

Adding the pleats
The bodice for the gown came together easily and quickly, to my surprise.  As I seldom work with patterned fabric, I was worried about matching up and centering the design.   Yet I managed to get it to match up in the front beautifully.  The back, though, proved even better.  I love how the pattern gives a slimming effect.

Side-view
Once the bodice was assembled, it was a matter of attaching and pleating the skirt.  I decided to put padded box pleats in the back as suggested by Johnson's book.  It did mean more hand-sewing than I usually like when under a deadline, but as construction had been quick up to this point, I chose to take the time to produce a more accurate silhouette.

Gown completed!
Once the padding was sewn in and the pleats attached to the bodice, it was just a matter of hemming the skirt and lining.  I managed to finish the gown by Wednesday, giving myself two full days to put finish up the details.

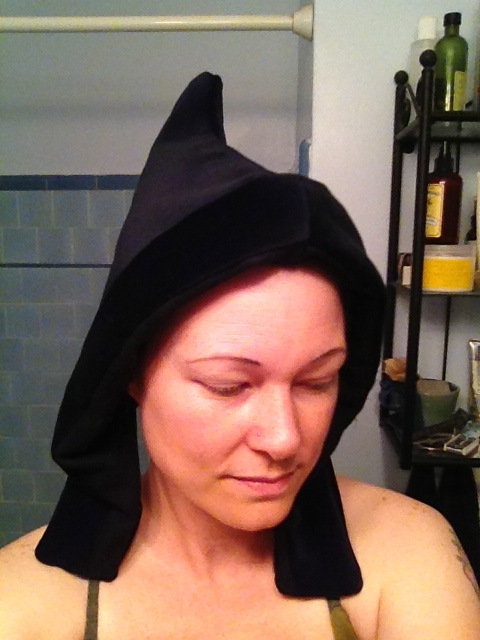
The bonnet was very easy to construct.  A little facing, but otherwise only two pieces of outer fabric (black velvet) and two pieces of lining.  Since I chose a bonnet with a uh... elfin profile, I did need to use about a yard of millinery wire to support the point.  I was able to hand-sew that in with plenty of time to spare.

Kebler-elf bonnet
I spent some time on Friday fidgeting with a few details.  Because of my lack of black lining fabric, I made sure to secure the hooks and eyes in the front as much as possible to avoid the edge rolling too much.  My efforts helped, but did not completely hide the white.  Of course, this fact would generate the one critical comment about the ensemble that I received today.


Lessons learned from this project:

  • A material inventory would have benefitted me greatly and saved me from using white lining fabric.  
  • While lining the skirt is beneficial in producing a beautiful inside to the gown, it is a pain to hem.  Perhaps I should try my hand at bag-lining?
  • I still loathe hand-finishing eyelets, though I found a few tricks to make it easier (buttonhole twist!).  
  • I also still hate piecing skirts.  I think that next time I will use a shaped front panel, but then use large rectangular panels for the sides and back, pleating them to give the right drape.
  • I rely a LOT of that ol' stand-by, the whipstitch.  I should take the time to perfect catch-stitching between layers for a more "invisible" finish--even when most of my hand-sewing is inside the garment.


Sunday, December 16, 2012

New Project: Part One, Chemise

The evening of the last post, I did manage to locate my white linen, cut the yardage desired, and launder it.  The next day, I pressed it.

And then the fabric just languished while life--and a few holiday parties--happened.


With some happiness, I can report that the fabric is no longer languishing, and has--in fact--been cut!  The edges of the pieces have all been zig-zagged.  And a few pieces have even be sewn together!

While numerous of my friends would chortle and deride such lack of progress, at least one that I know would/will/and does COMPLETELY understand what an ordeal it can be attempting to sew with a toddler in residence.

Declan fell asleep on our way home from this morning's archery practice.  As my spouse wanted to work on straightening up the garage, we simply let the boy nap while Daddy worked within a few feet of the car.  I took the opportunity to get the dining room transformed into my sewing studio.  I was also able to measure and cut out all the pieces of the chemise before Declan rose.

Once awake, the baby played with Daddy in the garage for a time.  I used the chance to stay-stitch and edge stitch all of the linen pieces.  But soon it was my turn to play parent.

Husband and I traded off similarly for most of the evening, and as of now--I can say that progress has been made!


A few notes about the chemise thus far.  I debated whether to use french seams or flat-felled seams.  I ultimately chose french seams, mainly as I was running dangerously low on white thread.  However, I didn't get too far, so could switch over after a trip to Jo-Ann tomorrow for thread.

Typically, I do neither, instead simply serging or zig-zagging the edges to prevent fraying and pressing the seam open. However, I do want to get back into the habit of creating clothing--not just "garb" or "costumes," and nicely finished seams, particular on items worn close to the skin, feel much nicer.

How to you finish your chemises/underclothes?  Do you have a preference?

Friday, December 7, 2012

New project at last!

After taking some time away from the sewing machine to relocate (too long, if you ask me), tonight I finally decided to dust off the brain meats and decide on a new project!

Holbein portrait of Jane Small (c1540)
At this last Great Western War, I took a class on kirtles and underclothes taught by the very knowledgable Lady Joan Silvertoppe.  That, plus the newly released book from the good folks at The Tudor Tailor, The Queen's Servents, have given me much inspiration.  As my persona is from the era, I've been eyeballing images of Englishwomen from around 1520 to 1540.  For YEARS I have wanted to create a version of the dress worn by Jane Pemberton Small, but I've let the blackwork intimidate me.     So to warm myself up for the task, I have decided to create an earlier silhouette.  The first step is deciding upon a smock/chemise!

A Young Englishwoman (c1520s)
The Queen's Servants lists a few neckline options; from squared to rounded, gathered to smooth.  As they're producing workable patterns to cover from the late 1400s up to about the 1520s, I decided to look to some portraiture (again) for inspiration.  I found two that I like: A Young Englishwoman by Hans Holbein, and Catherine of Aragon miniature by Lucas Hornebolte.

At the neck is seen either a partlet or the top of her smock.  It features a close round neck with a slit a button (or other) closure.  As I am the sort to need to slather sunscreen all over, the idea of covering my decollete is rather appealing!

Catherine of Aragon with a monkey (1525-6)
The miniature of Queen Catherine features a similar shape around the neck, only this time with some simple blackwork.  Though hers is most likely a sheer partlet and not her chemise, I like the style of embroidery and may try something like it on my smock.


Now that I have an idea in mind, it's time to get to work!  With the help of my husband, I've located the box with my linen stash and brought into the house.  Tomorrow I hope to bleach it, wash it, and at least prep it for cutting!  Wish me luck!

Sunday, October 7, 2012

an introduction

As much as I loathe the idea of having a dozen or so different blogs, I decided to finally create one to focus on my older, historical pursuits so that my other blog, The Moderne Hausfrau, can focus on the day-to-day and deco-period.  I felt that it was getting a touch "muddied" with the rare, though occasional, SCA-related post.

While the title of this blog currently is "A Tudor Lady," I should note that this--like my SCA persona--is a work in progress.  Currently, I am very interested in creating and playing a dynamic Tudor-era persona.  But it is true that when I started playing, I had a more medieval idea in my head.  I even entertained the notion of an early period persona, too.  In short--this blog my ebb and flow as my persona ebbs and flows.


In my first Tudor ensemble

The other day, just prior to our large, local war, I decided to update my page on the Caidan-wiki.*  (Note to non-SCA folk, I'll provide "footnotes" when applicable, but if I miss one--do comment with your question.)  Currently, my page is little more than a template.  Plus, it even has the older spelling of my name.**

In trying to decide what to write about my persona, I decided that perhaps a blog like this would be ideal to allow me to "brainstorm" about certain ideas and to showcase my journey in learning more about what the life of a Tudor-era lady would be.  I already have good ideas and information about questions like: what would she wear? what would she eat?  But I do, ultimately, want to figure out more.

Additionally, I am awful with dates regarding my own, mundane, life.  Even just listing dates, offices, and awards on the wiki page was daunting as I cannot easily recall exactly when any of those things happened.  

This blog will not only chronicle my exploration and research, but also my adventures in costuming, cooking, other arts & sciences, and even event recaps.  I do not claim to be an expert in any of the subjects that I'll be posting about, please DO keep that in mind.  I suspect that, eventually, this blog will contain solid evidence of mistakes in my work.  That said, I hope that if an expert ever does decide to give this little blog a read, that they will offer constructive criticism, and will help to point out my errors while celebrating my successes.

*: Caid is the name of our local SCA Kingdom.  The kingdom was its own wiki, complete with information on many individuals who play in kingdom.
**: In the SCA, one may create a name for their personae.  Certain rules do apply.  The original name that I submitted was judged to have too old of a spelling for the time frame that I want to play, so the spelling was updated.